
Kia Soul (SK3): Maintenance / Climate control air filter
Filter inspection
If the vehicle is operated in the severely air-polluted cities or on dusty rough roads for a long period, it should be inspected more frequently and replaced earlier. When you, the owner, replace the climate control air filter, replace it performing the following procedure, and be careful to avoid damaging other components.
Replace the filter according to the Maintenance Schedule.
Filter replacement
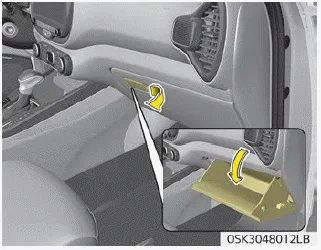
1. Open the glove box.
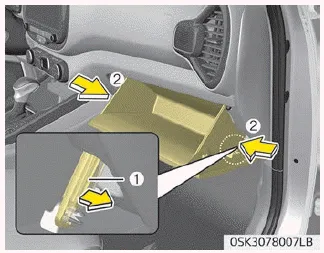
2. With the glove box open, pull the support strap (1).
3. Push in Both sides (2) of the glove box as shown. This will ensure that the glove box stopper pins will get released from its holding location allowing the glove box to hang.
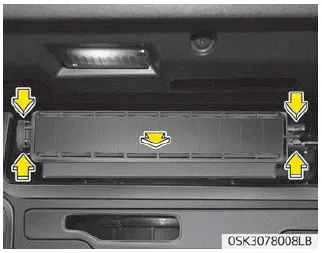
4. Remove the climate control air filter case by pulling out both sides of the cover.
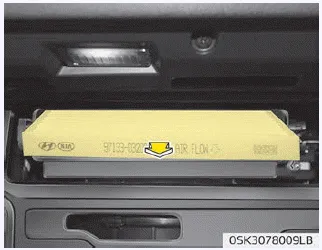
5. Replace the climate control air filter.
6. Reassemble in the reverse order of disassembly.
NOTICE
When replacing the climate control air filter install it properly. Otherwise, the system may produce noise and the effectiveness of the filter may be reduced.
Filter replacement It must be replaced when necessary, and should not be washed. You can clean the filter when inspecting the air cleaner element. Clean the filter by using compressed air.
Blade inspection NOTICE Commercial hot waxes applied by automatic car washes have been known to make the windshield difficult to clean. Contamination of either the windshield or the wiper blades with foreign matter can reduce the effectiveness of the windshield wipers.
Other information:
Kia Soul (SK3) 2020-2025 Owners Manual: Explanation of scheduled maintenance items
Engine oil and filter The engine oil and filter should be changed at the intervals specified in the maintenance schedule. If the car is being driven in severe conditions, more frequent oil and filter changes are required. Drive belts Inspect all drive belts for evidence of cuts, cracks, excessive wear or oil saturation and replace if neces
Kia Soul (SK3) 2020-2025 Owners Manual: Vanity mirror lamp bulb replacement
WARNING Prior to working on the Interior lamps, ensure that the “OFF” button is depressed to avoid burning your fingers or receiving an electric shock. 1. Using a flat-blade screwdriver, gently pry the lamp assembly from interior. 2. Remove the bulb by pulling it straight out.
Categories
- Manuals Home
- Kia Soul Owners Manual
- Rear seat adjustment
- Features of your vehicle
- Mirrors. Outside rearview mirror. Folding the outside rearview mirror
- New on site
- Most important about car
